Categories
Fitness & Training

Measuring Strength With RPE Vs 1RM Percentage Training

Tribe By Noire

Measuring Strength With RPE Vs 1RM Percentage Training

Building strength is paramount to creating a true body transformation. Developing strength is the key to building muscle and as your muscle mass grows, your ability to drop body fat increases. This is why you need reliable ways to measure strength. Anyone serious about getting the most results out there training needs the numbers.

You need to know how much weight you can lift and for how many reps. This is all based on effort and the 2 ways we measure that effort is relative perceived exertion (RPE) and percentage training based on your 1 rep max (1RM).
Measuring Strength With RPE Vs 1RM Percentage Training

Relative Perceived Exertion (RPE)

RPE is short for relative perceived exertion. Its a measure of effort on a scale of 1-10 , 1 being the least amount of effort, and 10 being the most. With RPE you choose the weight you use relative to prior experience. Here’s  an example.

  • Your goal is to complete a set of 10 reps.
  • Using your max effort your’re only able to finish 10 reps @ 225 lbs.
  • This means that an effort level of 10 RPE is 225.
  • Your RPE within a 10 rep range is relative to 225 lbs.

Here’s the next logical question. If 225 lbs is a 10 RPE for me, how do I figure what a 6,7,8, or 9 RPE is? Here’s how it works.

  • 10 reps @ 10 RPE means I cannot do any additional reps at that weight.
  • 10 reps @ 9 RPE means I can do 1 additional rep at that weight. (11 rep capacity)
  • 10 reps @ 8 RPE means I can do 2 additional reps at that weight. (12 rep capacity)
  • 10 reps @ 7 RPE means I can do 3 additional reps at that weight. (13 rep capacity)
  • 10 reps @ 6 RPE means I can do 4 additional reps at that weight. (14 rep capacity)

RPE works for more than just sets of 10, but be mindful that anything under 6 RPE is a waste of time. I personally only use a 6 or 5 RPE for warm up sets.

1 Rep Max Percentage Training (1RM)

This method is more commonly used for the big 3 compound lifts like the squat, bench press, and deadlift. It’s also used in Olympic weightlifting for the barbell snatch and the barbell clean & jerk. Unlike RPE, percentage training is all based on effort relative to your 1 rep max. This makes sense for powerlifters, especially competitive ones because its all about how much weight you can lift one time. If you decide to use percentage training, I recommend training in between 70-95% of your 1RM. 

CALCULATING YOUR 1 REP MAX

There’s a couple of ways to do this. The 1st method  would be to start with a couple sets of 3-5 reps to warm up and then keep doing singles, gradually increasing the weight until you hit your max.

The 2nd way to do this would be more so for newbies to the grind. Run an entry level training program that uses a rep goal system and/or RPE. I have a variety of training programs designed for this at tribebynoire.com. At the end of that program you can calculate your 1 rep max by using a 1 rep max calculator. Go to your app store and search “1RM calculator” and download the one with the best rating. Its that simple! All you’ll need to do is input the heaviest weight you used and how many reps you completed. This is the safest and smartest route to go for new and even intermediate lifters.

When To Implement RPE & 1RM

Some coaches prefer to use RPE and others prefer to use 1RM percentages. Both methods work, but only if they’re implemented correctly. I prefer to use both methods, but for different purposes. 

WHEN I USE 1RM PERCENTAGES

I only use this method with the big barbell lifts like the squat, bench, deadlift, and sometimes the overhead press, depending on how advanced the lifter is. The caveat with this method is that it becomes increasingly inaccurate with high reps sets (anything over 8 reps). This is because muscular endurance starts to become more of a factor as the set gets longer.

WHEN I USE RPE

This method works well with exercises that you would never test for 1 rep maxes, like lunges, lat pull downs, or tricep extensions. RPE works well for accessory exercises, and rep ranges of 8 or more. 

Tribe By Noire

tribe by noire

I’ve created this platform to help you become the most powerful version of yourself through fitness, plant based nutrition, and mindset coaching.

Categories
Fitness & Training

Exercise Selection And How To Make The Right Choices

Tribe By Noire

Exercise Selection And How To Make The Right Choices

We all have our reasons for being regulars at the gym. Some people want to go to the gym just to have some adult playtime, while others just want to blow off steam, but maybe you want to create something real. Maybe you’ve made a commitment to yourself to achieve a true body transformation. If you’re working toward developing an athletic defined body that truly reflects the work you put in, then the information I’m giving you here is something you NEED to know.

I’m gonna go point by point through a few key rules and considerations when deciding what to do in your training routine

1. Keep It Simple

One of the biggest mistakes you can make in your training is implementing too many variations of the same kind of movement. Choose a primary lift and 1 or 2 accessory exercises for each muscle group and work on developing your strength and technique as much as possible in those exercises. Here’s a few examples of the best exercises for each muscle group.

Glutes & Quads
  • (Primary) Barbell Back Squat
  • (Accessory) Barbell Hip Bridge
  • (Accessory) Dumbbell Bulgarian Split Squat
Glutes & Hamstrings
  • (Primary) Barbell Conventional Deadlift
  • (Accessory) Dumbbell Bulgarian Deadlift
  • (Accessory) Prone Leg Curl
Chest, Shoulders & Triceps
  • (Primary) Barbell Bench Press
  • (Accessory) Dumbbell Shoulder Press
  • (Accessory) Weighted Dip
Back, & Biceps
  • (Primary) Barbell Hang Row
  • (Primary) Weighted Pull Up
  • (Accessory) Dumbbell One Arm Row
Abs & Obliques
  • Cable Wood Chop
  • Weighted Sit Up
  • Hanging Leg Raise

Knowing What's worth Your Time

Starting your 1st set of the workout puts you on the clock and your workouts should only be around 45-60 minutes, 90 minutes at the most. This means you just simply do not have the time to goof around with exercises that yield little benefit. Your primary focuses should be the big compound lifts and 1-2 accessory exercises that help you develop those lifts the most.

Here’s a quick hypothetical for you. If you could only choose 1 exercise to build your chest, which would it be, cable chest flys or Bench Press? The best choice would fit this criteria.

  • Its an exercise that I can add a substantial load to.
  • It develops the other smaller assistance muscles.
  • It won’t cause muscular imbalances.

Do What Your Body Responds To Most

There’s a whole variety of different ways to hit a muscle or muscle group, but the ideal exercise is the one that gives you the most gains. For example, my quads respond very well to the back squat, but yours may respond much better to the front squat. If your primary focus for squatting was getting the most growth in your quads, you would  choose the front squat. 

Another example would be grip width and stance width.

  • Bench Press – A more narrow grip on the bench press would target your shoulders and triceps more. A wider grip would activate more chest and shorten the range of motion.
  • Barbell Rows – A wide grip would target your rear delts and traps a lot. A narrow grip would target your lats mainly.
  • Sumo Deadlift – This wide stance deadlift is more geared towards developing a rounder fuller butt by targeting your glute medius way more than a narrow style deadlift.
  • Conventional Deadlift – This deadlift forces you to hinge more at the hip which places more tension on your back and hamstrings.

There’s tons of other examples, but these are some big ones.

Weaknesses and/or Injuries

Injuries are pretty easy to figure out for the most part, but identifying weaknesses is what you may need more of a trained eye for. Examples of weakness would be bad posture, or just bad form in general due to certain muscles not firing the way they should. 

Weak quadriceps would cause you to excessively lean forward in a squat. A good remedy for this would be goblet squats, or some kind of front loaded variation. These front loaded variations are meant to get you in a more vertical position that forces you to engage your quads more, rather than compensate using other muscles.


Other indications of weakness would be things like relative strength between lifts. For example, you should be able to row the same weight you bench press. Being able to press more than what you pull is a clear sign of a weak back and this will ultimately lead to injury.

We could talk for a whole hour just on this topic alone, but if you need any further answers, feel free to ask your questions in the comments, or request a consultation here.

Tribe By Noire

tribe by noire

I’ve created this platform to help you become the most powerful version of yourself through fitness, plant based nutrition, and mindset coaching.

Categories
Fitness & Training

Full Body Training Vs Body Part Split Training For Muscle Hypertrophy

Tribe By Noire

Full Body Training Vs Body Part Split Training

A relatively new debate has risen in the marketplace of fitness in regards to muscle hypertrophy. The most common approach to muscle building for the most part has been body part split routines, but now this method is being challenged by the idea that full body training is actually superior. There are even scientific studies that show full body training is the way to go. There’s a lot of nuance in this discussion, so I’m gonna break this down for you, so you can understand it from every angle.

The 3 Most Important Factors For Muscle Building

Understand that no matter what training split you choose, it will only work if its implemented correctly. In regards to muscle building your program needs these 3 things.

  • Frequency – This is how many times per week you train a muscle. Ideal frequency should be 2-3 times per week with 24-48 hours in between.
  • Volume – This is your weekly total of how many sets and reps you do. For hypertrophy, volume should be between 14-20 sets per week.
  • Intensity – This is how hard you train a muscle within a training session. The weight you use on the big compound lifts should be between 70-85%.

All three of these factors have to be in your program with frequency and volume being the top priorities. The training split you choose will determine the levels that these factors will be implemented at.

Full Body Training

Full body training is pretty self explanatory. On each training day you would target all the major muscle groups with mostly compound exercises that target,

  • Pressing muscles
  • Pulling muscles
  • Lower body muscles
  • Core muscles

Here’s what a week of training on a full body program would look like.

Day 1
  • Back Squat
  • Romanian Deadlift
  • Bench Press
  • Pull Up
  • Overhead Press
  • Wood Chop
Day 2
  • Conventional Deadlift
  • Bulgarian Split Squat
  • Incline Press
  • Chest Supported Row
  • Dip
  • Hanging Leg Raise
Day 3
  • Back Squat
  • Push Press
  • Hang Row
  • Close Grip Bench Press
  • Glute Ham Raise
  • Weighted Sit Up

Full body training is all about high frequency training and the big compound movements. According to scientific research, full body training yields better results than body part split training because of the high priority on frequency. The high frequency also offsets the fact that volume is not going to be as high as a body part split. Doing 20 sets a week on all the big lifts will burn you out and ultimately cause you to lose muscle and strength. You can reach 15 sets weekly by doing 3 sets on each muscle group on the 3 days of training.

This training split would be ideal for you if,

  • You only have 3 days to commit to training.
  • You need to prioritizing training for your sport.
  • You struggle with being consistent with training.

The Upper Lower Split

The upper lower split is also pretty self explanatory. You alternate between an upper body training day and a lower body training day. Here’s what a week of training on an upper lower split would like.

Day 1
  • Back Squat
  • Romanian Deadlift
  • Walking Lunge
  • Prone Leg Curl
  • Cable Wood Chop
  • Hanging Leg Raise
Day 2
  • Chest Supported Row
  • Bench Press
  • Lat Pull Down
  • Overhead Press
  • Spider Curl
  • Weighted Dip
Day 3
  • Conventional Deadlift
  • Bulgarian Split Squat
  • Walking Lunge
  • Prone Leg Curl
  • Cable Wood Chop
  • Hanging Leg Raise
Day 4
  • Incline Press
  • Lat Pull Down
  • Chest Press
  • Single Arm Row
  • Skull Crushers
  • Hammer Curl

With the upper lower split, frequency is reduced to 2x per week, but its easier to reach a training volume of 20 sets per week. This is the training split I use mostly and what I’ve known to work for most people in my experience. It gives you the benefits of a body part split without sacrificing too much frequency. With this split you also get 3 off days to work on things like mobility and cardio conditioning.

Push Pull Legs

This training split is not for the faint of heart. This isn’t for the people who “just want to build some muscle.” This is for those who are truly dedicated to building a phenomenal physique. The 20 sets of volume is very easy to reach with this training split, and the intensity as well. The main draw back to this training split is that it is 6 days per week.

2x Per Week

Push
  • Bench Press
  • Incline Press
  • Arnold Press
  • Lateral Raise
  • Skull Crushers
  • Weighted Sit Up
Pull
  • Hang Row
  • Lat Pull Down
  • Single Arm Row
  • Reverse Fly
  • Barbell Bicep Curl
  • Spider Curl
Legs
  • Barbell Hip Bridge
  • Back Squat
  • Romanian Deadlift
  • Bulgarian Split Squat
  • Prone Leg Curl
  • Hanging Leg Raise

This type of training split makes room for a great deal of exercise variation and rep schemes. Hitting 20 sets per muscle group shouldn’t be a problem, as long as you do all 3 workouts twice per week. I wouldn’t advise you to do this training split if you struggle with motivation, consistency, and/or a busy schedule.

In conclusion, all methods work well if implemented correctly, but the determining factors in which route you choose depends on your lifestyle and goals..

Tribe By Noire

tribe by noire

I’ve created this platform to help you become the most powerful version of yourself through fitness, plant based nutrition, and mindset coaching.

Categories
Fitness & Training

3 Body Transformation Training Strategies You Need To Be Using

Tribe By Noire

3 Body Transformation Training Strategies You Need To Be Using

I’m sure you’ve seen some really drastic before and after pictures floating around, especially on instagram. On the left would be a guy or gal, flabby, bad posture, and an unenthusiastic facial expression to match. Then on the right is the same person, lean, tanned, and standing tall with a smile from ear to ear. You may look at images like that and think WOW I wonder how they did it!?

As a coach myself with over a decade of experience, I’ve figured it out. We know the diet has to be on point, but no matter how good your diet is, you won’t be able to make that transformation without the right type of training. There’s many different ways to train, but to make a real physique transformation there are 3 strategies you need to be using in order to see consistent results. 

3 Body Transformation Training Strategies You Need To Be Using

1- Rep Goals

The rep goal strategy is where you set a specific amount of reps with a set amount of weight. An example of this would be setting a goal of 24 reps at 185lbs within 3 sets on the bench press. That comes out to 3 sets of 8 reps if you were to do the same amount of reps on each set. Reaching your rep goal serves as an indication that you can go up in weight. You’re not ready to go up in weight if you don’t reach the rep goal.

Using this strategy is one of the best ways I’ve found to track your strength progress without doing 1 rep max tests. This is particularly a good idea for anyone in there first few years of training. You may not care too much about strength, but you will not build muscle without gaining strength.

AMRAP Sets

2- AMRAP (As many reps as possible)

Doing AMRAP sets is how you get the absolute most out of a workout. Not only does this stimulate crazy muscle growth, but it also puts you in serious fat burning mode. There’s 2 main ways to use this strategy and its important to know when and with what type of exercise.

Last set AMRAP

This is ideal for the strength training portion of your workout, especially in combination with the rep goal strategy. Get as many reps as possible on that last set and see how far beyond your rep goal you can get. There’s no reason to stop short.

Body weight training

When using body weight exercises to build muscle, the most important factor is reps. The amount of muscle you build with body weight training is directly correlated to how many reps you can do. As a bonus, this also has a cardio training effect which will result in improved stamina and fat loss. 

3- Super Sets

A super set is when you do 2 exercises back to back with little to no rest time between them. This is a smart way to improve time efficiency in your workout, train lagging muscles,, and increase the frequency of how many times you train a muscle group in a week. Here’s a few super set examples.

Lower body Training
  • Squats & Calve Raises
  • Stiff Leg Deadlift & Leg Curls
  • Lunges & Single Leg Hip Bridges
  • Banded Crab Walks & Hip Bridges
Upper Body Training
  • Chest Press & Bicep Curls
  • Rows & Tricep Extensions
  • Overhead Press & Reverse Flies
  • Lat Pull Down & Side Delt Raises

Plug in 1-2 super sets towards the end portion of your workouts to maximize muscle growth. Using all 3 of these strategies in each workout is a real game changer, trust me.

100% Vegan Naked Pea Protein Powder

My Top Vegan Protein

If you need a vegan protein supplement that tastes good, has a good texture, and doesn't have all the additives and colors, give this one a go. each serving is 27 grams of protein and 120 calories.

Tribe By Noire

tribe by noire

I’ve created this platform to help you become the most powerful version of yourself through fitness, plant based nutrition, and mindset coaching.

Categories
Fitness & Training

The Push / Pull / Legs Body Part Split Explained

Tribe By Noire

Push Pull Legs Training Split Explained

Push-Pull-Legs Split Explained

There are many different types of training splits to choose from, but right now I’m going to put some focus on one of my absolute favorites. The push, pull, legs training split is a favorite of mine, not just for the results I’ve gotten from it, but also for what its done for my training clients. 

Here’s a few ways to tell if this training split is for you.

  • You’re only able to train 3 days per week.
  • You get bored with a conventional body part split.
  • You’re an athlete who practices a sport multiple times a week.
  • You’re a natural lifter trying to build an impressive physique.
  • You want to do powerlifting or powerbuilding.

How This Training Split Works

The push pull legs training split is divided into 3 primary training days. On the push training day, you train all of the muscles that produce or assist in pushing movements. These muscles are typically the ones you use in bench pressing, shoulder pressing, and abs. On the pull training day, you’d train all of the muscles that are opposite from pushing. This would be the muscles that you use during rows, pull ups, and deadlifts. The leg day is reserved for all of the muscles you have from the waist down. The primary exercises on the leg day would be squats, lunges, deadlifts, and hip bridges. 

In my personal experience and with clients, the best physique results come when the 1st day is legs, 2nd day is push, and the 3rd day is pull, with a rest day between each. Leg day is the most demanding, so prioritizing it on day 1 allows you to come into the gym fresh and fully recovered. Push I put at number 2 rather than pull because push day typical doesn’t call for the use of any of the muscles from leg day.

Here’s some quick examples of how it would look.

LEGS

Squat

Deadlift

Hip Bridge

lunge

PUSH

Shoulder Press

Chest Press

Tricep Dip

Abs


PULL

Row

Pull Up

Bicep Curl

Reverse Fly

How Many Exercises Per Training Day

The answer to this question really depends on what your focus is and what your strengths and weaknesses are. Typically I think in terms of primary and accessory. So as an example, if the focus on push day is to develop bigger, shoulders, you would do 2 – 3 exercises for that muscle group. The Primary exercise would be a barbell press, single arm dumbbell press, and lateral raises. Then you’d use 1-2 exercises for chest triceps and abs. Over all, you’re looking at 5-8 exercises per training day.

Push Pull Legs For Powerlifting

Powerlifting revolves around the big 3 barbell lifts, bench press, squat, and deadlift. This is perfect for a 3 day training split because you can now have each training day dedicated to improving a specific lift. This means you can focus on strength, technique, and volume all at the same time. An important factor for natural lifters is the emphasis on recovery. Having more rest days means you get to go all out on your training days and see consistent gains without reaching burnout. 

Here’s an example of what training days would look like.

DEADLIFT

Barbell Deadlift

Single Arm Row

Single Arm Farmers Carry

Hanging Leg Raise

BECH PRESS

Barbell Bench Press

Dumbbell Incline Press

Half Kneeling Single Arm Press

Prone Tricep Press

SQUAT

Barbell Back Squat

Barbell Hip Bridge

Goblet Reverse Lunge

Prone External Knee Tuck

Cardio Conditioning

Cardio is a whole other topic on its own, but to keep things simple I’ll just tell you what I and my clients have seen the most results with. If you’re trying to lose body fat and gain muscle at an optimal rate, while still having a life outside of the gym, do 20 – 30 minutes of high intensity cardio conditioning a week. This can be sprinting, battle rope drills, burpees, etc. You can do this on training days, or non training days. I personal stick to 4-8 minute conditioning sessions 2x per week.

Tribe By Noire

tribe by noire

I’ve created this platform to help you become the most powerful version of yourself through fitness, plant based nutrition, and mindset coaching.

Categories
Fitness & Training

The Barbell Squat Guide For Complete Lower Body Development

Tribe By Noire

The Barbell Squat Guide For Complete Lower Body Development

CONNECT WITH ME ON SOCIAL MEDIA

There are many different barbell variations to choose from, so I’m gonna breakdown the differences and what you want to consider when choosing. 

  • Mobility limitation and injuries
  • Focus muscles and weaknesses
  • Posture and muscular imbalances

These key considerations make the difference between developing your lower body the way you want it and wrecking your joints. If you’re not sure how you should be squatting, keep reading.

Barbell Back Squat

This is the most commonly used barbell squat, probably because its the least technical one. Mounting the bar on your back allows you to squat more weight than other variations.

When done right, through a full range of motion, your quadriceps, hamstrings, and glutes are targeted pretty evenly. The bottom position is where you get the most muscular activation in the glutes and hamstrings.

Toes should be slightly turned out with your knees tracking in line with the toes. Forcing your knees out over your toes during each rep will protect your knees and really target your glute medius.

The glute medius sits right above your glute maximus and completes the roundness and fullness of your glutes.

Barbell Low Bar Back Squat

This is a slightly different variation of the conventional back squat where the bar rests a bit lower on your back. This changes the center of gravity, creating more of a bend at the hip and less of a bend at the knee.

This slight change in form targets the glutes and hamstrings more and is a great alternative to those with limited ankle mobility, or over developed quadriceps. 

This squat variation places more of a demand on the torso, so if you have a weak core, back injury, or poor posture, this may not be the one for you.

Rest the bar right above your rear delts instead of directly at the top of your trapezius. Pull the bar in tight, squeezing your shoulder blades together.

Barbell Sumo Squat

The sumo squat is a great exercise for total glute development with a major focus on the glute medius. Being that the hamstrings aren’t as involved in this movement means more focus on the quadriceps.

 This squat variation doesn’t require a great deal of mobility which is great for those who have limited hip and ankle mobility. Just make sure you’re doing accessory exercises for working on your limitations.

The stance here is going to be much wider, which is going to require a bit more flexibility in the inner thighs. You want to make sure that you maintain a vertical shin in the bottom position. As usual, your knees she track in line with your toes.

Barbell Front Squat

The front squat is a bit more technical because of its emphasis on torso stability and shoulder mobility. On the flip-side the key advantages are the safety. You don’t have to worry about getting stapled under the weight because you can just dump it in front of you.

The primary reasons for front squatting are quadricep development, core strength development, and posture improvement. This carries over to all of the other barbell squats making you much more efficient at squatting.

Staying as vertical as possible throughout each rep is a key focus here. Keep your chest up and elbows pointed straight ahead. Do not let your elbows touch your thighs.

In the video I show you a couple of techniques to use if you have limited shoulder mobility and can’t quite get the front racked position.

Barbell Zercher Squat

The zercher squat is a great alternative to the conventional barbell front squat. It doesn’t require the shoulder mobility, or as much torso stability. You might want to start here when first getting into front loading.

Start with the bar resting on your thighs and hook your arms under the bar. The bar should rest cradled right on the inside of the bend in your arm. Make sure the bar, and your arms do not touch your thighs.

This barbell variation puts much more concentration on the legs by taking a great deal of stress off of the torso. Still, you need to focus on maintaining a vertical position.

Having the bar rest in the crease of your arm may be a bit uncomfortable. Use a cushion on the bar for extra support.

Tribe By Noire

tribe by noire

I’ve created this platform to help you become the most powerful version of yourself through fitness, plant based nutrition, and mindset coaching.

Categories
Fitness & Training

Top 3 Strategies For Building Lean Muscle Mass

Tribe By Noire

Top 3 Strategies For Building Lean Muscle Mass

There are all kinds of different opinions on how to build lean muscle mass. To be honest with you, any strategy can work if you do it for the right amount of time. The catch is that even the greatest strategy will ultimately stop working over time. The smart strategy is to have not just one, or even two, but have 3. Let’s get into the top 3 strategies of lean mass building.

1

Increase The Amount Of Weight

Muscle size will increase as you become stronger. The reason for this is because your body has to adapt to heavier weight . A good example of strength training would be to 5 sets of 5 reps. The idea is that you stick with the same amount of sets and reps, but week after week you increase the amount of weight. 

Week 1

5×5 @ 135 lbs

Rest 2-3 mins between each set

Week 2

5×5 @ 155 lbs

Rest 2-3 mins between each set

Week 3

5×5 @ 175 lbs

Rest 2-3- mins between each set

Week 4

5×5 @ 195 lbs

Rest 2-3- mins between each set

This strategy can work for a few consecutive months, as long as you include deload weeks. For those of you who don’t know, a deload week is a training week where you significantly reduce training intensity to recover from training stress. Basically just lift light that week. Ultimately though, this strategy will stop working due to the fact that strength progress will slow down and it will become impossible to continue adding weight to the bar.

2

Increase The Amount Of Training Sets

Muscle size will grow in order to accommodate a greater training volume. Your training volume basically implies the quantity of repetitions you do rather than the quantity of weight you lift.  A good example of this training volume strategy would be increasing the amount of sets you do with a given weight from week to week. 

Week 1

5×8 @ 135 lbs

Rest 1-2 mins between each set

Week 2

6×8 @ 135 lbs

Rest 1-2 mins between each set

Week 3

7×8 @ 135 lbs

Rest 1-2 mins between each set

Week 4

8×8 @ 135 lbs

Rest 1-2 mins between each set

This strategy can work for a few months as well, but eventually you will have to change strategies because it will be impossible to continually keeping adding sets. Attempting to do so will result in workouts being excessively long and over training which leads to a decrease in muscle mass as well as performance.

3

Increase The Amount Of Training Reps

This strategy is an alternative way to increase training volume. The goal with this strategy is to gradually increase the amount of reps you do in a given set. Unlike strategy number two, this method doesn’t require you to increase the amount of sets you do. The amount of sets you do should actually decrease, which would serve as an indication that you’re strength and muscular endurance  is improving. This strategy especially works with body weight exercises like push up and pull ups. Its also a very effective way to train arms, or any single joint muscle.

Week 1

100 rep goal

Complete in 6 sets

Rest 15-30 secs between each set

Week 2

100 rep goal

Complete in 5 sets

Rest 15-30 secs between each set

Week 3

100 rep goals

Complete in 4 sets

Rest 15-30 secs between each set

Week 4

100 rep goal

Complete in 3 sets

Rest 15-30 secs between each set

Before you try this strategy, BE WARNED, this is an intense method and takes tremendous will power. Squeezing out every last rep you can, burns like crazy. Eventually though you’ll have to ease off of this type of training because it can lead to over-use injuries because of the build up in inflammation in the muscle tissue. 

Tracking Performance & Channging Methods

Driving muscle is a matter of manual transmission. You gotta know when to switch gears. One of the most common things I’ve seen people do is stick with a certain training method to the point that their progress stalls. The easiest way to avoid this is to track your progress really closely. Typically the first 3 months that you follow a given strategy, you’ll see pretty good results. After that 3 month mark, things can start to slow down. That slow down in progress is an indication that its time to make a change. 

In my experience, using two different strategies from opposite ends of the spectrum yield the most results, with minimal sacrifice. The way I would advise you to do this is by splitting your workouts up into 2 phases. The 1st phase would be the low volume heavy lifting, and the 2nd phase would be the higher volume with lighter loads. In most cases this is best way to get the most benefit out of every training session. Here’s what it would look like.

Session 1

Phase 1 (Low Volume/Heavy Weight)

Barbell Back Squat

Phase 2 (High Volume/Low Weight)

Dumbbell Goblet

Prone Leg Curl

SESSION 2

Phase 1 (Low Volume/Heavy Weight)

Barbell Bench Press

Phase 2 (High Volume/Low Weight)

Dumbbell Incline Press

Seated Row

SESSION 3

Phase 1 (Low Volume/Heavy Weight)

Barbell Deadlift

Phase 2 (High Volume/Low Weight)

Barbell Hip Bridge

Prone Leg Curl

SESSION 4

Phase 1 (Low Volume/Heavy Weight)

Barbell Overhead Press

Phase 2 (High Volume/Low Weight)

Lat Pull Down

Face Pull


Tribe By Noire

tribe by noire

I’ve created this platform to help you become the most powerful version of yourself through fitness, plant based nutrition, and mindset coaching.

Categories
Fitness & Training

The Most Important Training Factor For Muscle Growth

Tribe By Noire

The Most Important Training Factor For Muscle Growth

You can go on google right now and type in “the best way to gain muscle” and all types of different answers will pop up. This is one of the reasons why most people have no idea what to do. What I aim to do here is simplify this topic as much as possible. I’m going to give you just ONE thing to focus on. So let’s talk about the most important training factor for muscle growth.

Focus On The Muscle Contraction

Focus on the muscle contraction! Sounds simple enough right? You see, training just serves as a form of stimulation, so greater stimulation naturally leads to greater gains, assuming you’re eating the right foods and sleeping enough.  What I’ve come to notice in my years of training clients is that most people don’t really have this understanding, so they never really focus on the contraction of the muscle they’re targeting. Maybe you’re guilty of this also.

What To Do When You're Not Feeling It

Its actually pretty common for people, especially beginners to not really feel the muscle working. The reason for this is a lack of what we gym rats call “The Mind Muscle Connection”. You have to develop a connection between your mind and whatever muscle your targeting. This can pretty difficult to do during complex movements. Pretty common examples of this are.

  • Not feeling your butt, or hamstrings during a squat or deadlift.
  • Not feeling your lats and mostly feeling your biceps in a row or pulldown. 
  • Only feeling your shoulders in a chest press.

If you identify with any of these examples, I’d advise you to take some time out in the beginning of your workout to do some isolation exercises that specifically target those dormant muscles. Some examples of that would be.

  • Hip Bridges and/or Donkey Kicks to target glutes.
  • Single Arm Lat Pulldown with a lateral torso flex to target lats.
  • Neutral Grip Cable Flys to target pecs.

*Become a member at Tribe By Noire to get video tutorials for all of these exercises and more. Extensive training programs are also included.

Take your time with each rep while performing isolation exercises to get the most benefit to your mind muscle connection.

Tribe By Noire

tribe by noire

I’ve created this platform to help you become the most powerful version of yourself through fitness, plant based nutrition, and mindset coaching.

Categories
Fitness & Training

The Truth About Squat Depth

Tribe By Noire

The Truth About Squat Depth

How deep should you squat? This is a question I get very often and its also a pretty loaded question. There is an ideal form of squat depth, but you also have to work within the confines of your mobility all while working to improve your mobility. So let’s dive a bit deeper into the truth about squat depth.

3 Things You Need To Know About Squat Depth

1. We all have the same parts, but we also have those parts in different measurements. Our proportions range differently from person to person which means our squat depth should as well. Even though our depth will range from person to person, it does not serve as an excuse to squat shallow.

2. Ultimately you should be able to sit in a squat position comfortably, pretty much how a toddler normally would. When did we lose our ability to sit in a proper squat position? Probably when we started spending most of our days sitting in a chair. That 90 degree knee bend, inherited from the chair has now become most people’s standard for squat depth. 

3. Squatting to full depth is only bad for your knees if you have imbalances like, weak glutes, overly developed quadriceps, and/ or limited ankle limited ankle mobility. If your bottom position feels uncomfortable, mobility is definitely an issue and needs to be addressed on a daily basis.

Learn To Squat Like A Toddler

Watch a one year old squat down to grasp something from the floor. Their feet stay roughly at hip distance, their knees abduct from their mid-line, and their hips drop to a full knee bend. Try to copy it and make note of where you feel the most discomfort.

Rounding of the back and falling backwards is usually a sign of limited ankle flexion. Push your knees out more and lean forward. If you can’t push your knees apart, it means you need to stretch the muscles in the inner thighs.

Grab hold of a door frame, or a pole fixture of some kind and use it to hold yourself up while you practice sitting in that bottom squat position. It may be tedious at first, but if you’re serious about getting good at squatting, you’ll stay consistent and work at this habitually.

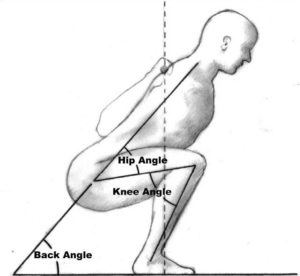
Here’s a look at what the technical anatomy of your squat should look like. When working on improving your squat depth, record yourself in video form and see how close to this illustration you get.

Tribe By Noire

tribe by noire

I’ve created this platform to help you become the most powerful version of yourself through fitness, plant based nutrition, and mindset coaching.

Categories
Fitness & Training

6 Tips To Improve Your Bench Press

6 Tips To Improve Your Bench Press

The barbell bench press is the standard for upper body strength which makes it an essential exercise to anyone trying to build upper body strength. It is also essential to do it correctly through a full range of motion, not only for maximum strength and muscular development, but also for joint health. No matter what your sport is, the form for the bench press remains the same and follows the same basic principles. Here are 6 tips to improve your bench press and save your shoulders.

1. Keep A Tight Grip On The Bar

Grip strength plays a large role in strength overall. In regards to the bench press, a loose grip on the bar results in the loosening of the smaller stabilizing muscles in the shoulder. This often result in a lack of control over the bar and even tearing of the shoulder. Keep tight on the bar and maintain control.

2- Keep Your Chest Up

Thoracic Extension (arching your back) is essential to any kind of weightlifting, due to the advantages it provides for torso position. This torso position makes it easier for you to retract your shoulder blades (scapular) to bring the bar down to the sternum. This also allows you to utilize the muscles in your upper back to assist in stabilizing the bar and driving it up to the top position. Think big chest.

3. Tuck Your Elbows At 45 Degrees

Tucking your elbows is also going to give you the ability to use your upper back muscles more and its also going to protect your shoulders. Benching with your elbows flared out is a very weak and risky position because of the lack of leverage and potential impingement at the shoulder joint. Keep those shoulders packed and secure throughout the press.

4- Unrack & Breathe In Deep

IBreathe deep into your belly, hold that breath throughout the rep, and exhale at the top. That deep breath allows you to get oxygen into the lungs while filling up the belly to create pressure, which helps stabilize the torso. Pull big air and push big weight.

5- Back & Hips Should Be Tight With Both Feet On The Ground

No loose bench pressing! People are often so focused on their chest that they forget about the rest of their body. Arch your back, keep your chest up, squeeze your butt, and push your feet into the ground. 

6- Keep Tight Until You Rack The Bar

There should be no slack in your body until the weight is racked. Treat the whole lift and every lift like its a thousand pounds.

Thank you for your time, I appreciate you!

-Remson

Join The Tribe

BECOME A TRIBE MEMBER